

 This is a short recap of what's needed to set up a regular backup of a Synology shared folder onto an USB drive plugged on an Asus router (running with Asuswrt Merlin).
The information needed for this specific operation is generally scattered in different places, so I regrouped everything while it's still fresh from my recent actions.
I'm confident enough in the 1TB mirrored storage of my Synology DS213+, but, beside the irreplaceable photos that I regularly archive on Blu-ray disks, there's about 20GB of important documents that could really use a more frequent and systematic backup.
Summary of operations in the great lines:
1. Setup an rsync server on the Asus router, which requires to:
1.a: install an adequate USB storage with a linux compatible format
1.b: install the AsusWrt Merlin firmware, which makes possible to...
1.c: install the required entware repository, which makes possible to...
1.d: download the rsync daemon (rsyncd)
1.e: configure rsyncd
2. Install and configure a backup utility supporting rsync on the Synology NAS
1. Preparing the Asus router RT-AC86U
 1.a: Install an adequate USB storage formatted in ext1/2/3.

Since the Asus router can only format the USB drive in FAT, NTFS and HFS, you will need to format it in another system. Ideally linux, with Gparted, but Windows partition utilities like Easeus, AOMEI Partition Assistant will also do the job just fine.

1.b: Install AsusWrt Merlin firmware
The stock Asus firmware won't let you install the necessary software to turn your router into an rsync server.To allow this, you need to install Asuswrt-Merlin firmware. The benefits of installing Merlin are multiple and many features initially found there have later been added to the official firmware.
For the RT-AC86U, the file will look like: RT-AC86U_384.10_2_cferom_ubi.w
It installs like any firmware file from Administration > Firmware Upgrade section.
You'll know that Merlin is installed next time you launch the web interface.

1.c: Install entware
Entware is a software repository offering various software programs that can be installed on your router.
The next actions cannot be done from the graphical interface, but require to use a Secure Shell terminal like Putty.
So, you first need to Enable SSH (Administration > System) to make this possible.

Because you are going to use custom scripts on the JFFS partition, you need to Enable JFFS custom scripts and configs (Administration > System)

This basically involves connecting to the router in SSH and running the script "entware-setup.sh"
Method Update:
_
____ ____ | |_ ____
/ _ | \| _)| \
( ( | | | | | |__| | | |
\_||_|_|_|_|\___)_|_|_|
Since Asuswrt-Merlin 384.15, installing entware is done via the Asus-Merlin Terminal Menu:
- just type in amtm
- then "ep" to install entware

1.d: Install and configure rsyncd
With entware installed, the following command will update the list of available software and is also a good way to check that the installation went fine (if not, scroll back in the terminal to see if any error occurred):
opkg update
The full list of software available is saved in /tmp/opt/var/opkg-lists/entware, but the following commands will seek rsyncd in that list so you know it's available for installation:
opkg list | grep rsyncd
The following command installs rsyncd:
opkg install rsyncd
1.e: Configuring rsyncd
 Tip: Consider installing Midnight Commander (opkg install mc) to make your life easier. MC is a powerful visual file manager (inspired from Norton Commander, familiar to all last century geeks). It includes a easy to use text editor.
 A manual can be found here.
rsyncd relies on 2 files to function:
A configuration file: rsyncd.conf,
A list of authorized users with their passwords: rsyncd.secrets
A configuration file: rsyncd.conf,
A list of authorized users with their passwords: rsyncd.secrets
To make things short, here's a working example of rsyncd.conf:
# /opt/etc/rsyncd.conf
# Next line required for init script
pid file = /opt/var/run/rsyncd.pid
log file = /opt/var/log/rsyncd.log
use chroot = yes
# MODULE OPTIONS
[backup]
comment = Synology Documents backup
path = /mnt/Backup/
use chroot = yes
max connections=5
read only = no
list = yes
secrets file = /opt/etc/rsyncd.secrets
uid = admin
auth users= user1, user2
strict modes = no
hosts allow = 192.168.1.101
ignore errors = no
ignore nonreadable = yes
transfer logging = yes
timeout = 600
And this is an example rsyncd.secrets, authorizing 2 users with password 'secret':
user1:secret
user2:secret
2. Installing Hyper Backup on the Synology NAS
The Shared Folder Sync application included in DSM is not suitable for our task because it only works between DiskStations of the same DSM version. It is not compatible with any other rsync server.

Instead, Hyper Backup (installed from the Package Center) works with many backup destinations, including any rsync-compatible server.


The first step is to choose the volumes and folders to backup.

A word about the directory structure:
The path /mnt/Backup represents the USB drive volume called "Backup".Because Hyper Backup wants the target to be a directory, not the root of the drive, it was necessary to create a directory called "Backup".
My point being: the entry in "Directory" must represent an existing directory, not the volume.

The user is obviously one that is included in rsyncd.secrets, and for the encryption, it's up to you:

3. Additional considerations
My first backup run started fine but eventually failed with the router apparently going off line after a short while.

The Synology log was useless in that case but the \entware\var\log\rsyncd.log file on the router indicated the root cause:
2019/04/30 08:21:03 [31749] receiving file list
2019/04/30 08:21:03 [31749] ERROR: out of memory in flist_expand [generator]
2019/04/30 08:21:03 [31749] rsync error: error allocating core memory buffers (code 22) at util2.c(105)
There are 2 mitigating factors to that problem:
1. Set a Bandwidth Limitation in HyperBackup, as it can be seen in one of my previous screen capture. This definitely helped for me.
2. Setup a swap file.
Based on this source: https://mydevtutorials.wordpress.com/2014/01/10/how-to-activate-swap-on-asus-rt-ac68u-router
1. Set a Bandwidth Limitation in HyperBackup, as it can be seen in one of my previous screen capture. This definitely helped for me.
2. Setup a swap file.
Based on this source: https://mydevtutorials.wordpress.com/2014/01/10/how-to-activate-swap-on-asus-rt-ac68u-router
#create a 256MB swap file ("count" is in Kilobytes)
dd if=/dev/zero of=/tmp/mnt/Backup/myswap.swp bs=1k count=262144
#set up the swap file
mkswap /tmp/mnt/Backup/myswap.swp
#enable swap
swapon /tmp/mnt/Backup/myswap.swp
That line can be inserted in the script /jffs/scripts/post-mount so it will auto-start with the router.
dd if=/dev/zero of=/tmp/mnt/Backup/myswap.swp bs=1k count=262144
#set up the swap file
mkswap /tmp/mnt/Backup/myswap.swp
#enable swap
swapon /tmp/mnt/Backup/myswap.swp
That line can be inserted in the script /jffs/scripts/post-mount so it will auto-start with the router.
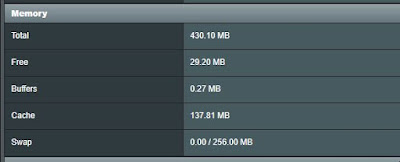
To check if swap is on, just type:
free
...or, in the web interface, go to the Tools > sysinfo
free
...or, in the web interface, go to the Tools > sysinfo

Note: you might not see the swap being used at all as it really kicks in when memory use reaches a certain threshold (swappiness). The goal here is just to avoid a out of memory situation. There is little benefit in using swap too early as it is generally slower than the internal memory.
No comments:
Post a Comment
Note: Only a member of this blog may post a comment.